How to Resurface Your Kitchen Cabinets

A refacing job can give you lovely, new-looking cabinets like these. See more pictures of kitchen decor.
©istockphoto.com/Wayne Howard

Your home is your castle -- it's where the heart is. At least that's how the old sayings go. For many people, it may be their most substantial financial investment. Even though the housing market is slumping, it won't stay that way. Hanging onto that classic craftsman in the up-and-coming neighborhood of your chic, growing city will most likely mean a good return on your investment one day. Even if you didn't buy as part of an investment strategy, your home is a safe haven from the stresses of work and the outside world.

Kitchen Decor Image Gallery

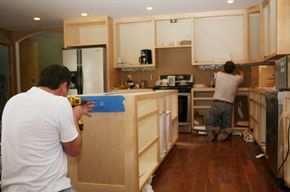
Inside your castle lays the "heart of the home" -- the kitchen. If you've ever hosted a party, then you know that for some reason most of the action takes place in the kitchen. Take a look around your kitchen. Are you happy with what you see? Did the previous owners lack all sense of style and good taste? Now look specifically at the cabinets. Are you embarrassed to stow your expensive china behind their flimsy, stained doors? Have you

Advertisement

Whether you decide to paint or reface, putting a fresh look on those tired old cabinets is a cheap way to update your kitchen. And if you plan on flipping the house for a profit, resurfacing provides you with the maximum return on your "sweat equity." Refacing your cabinets costs a fraction of what buying and installing new ones would, and you can do it yourself over a weekend. Painting is even cheaper and easier than refacing, and it's possible that you can finish the job in a full day's work.

In this article, we'll help you decide whether or not you're a good candidate for resurfacing and then walk you through the steps for refacing and painting your cabinets.

Advertisement

Planning and Preparation: Steps 1-3

Chabruken/Getty Images

If your cabinets are in good structural shape and you like the existing layout, then you're a good candidate for refacing. Craftsmanship was better in the "old days," so most pre-1980 cabinets are probably better than anything you could find at your home renovation retailer. All they need is some DIY love and they'll be as good as new.

So what exactly is refacing? Good question with an easy answer -- refacing means replacing the doors, drawer fronts and hardware, and covering the sides and framework with stick-on veneer or glued-on plywood. What you get is a new-looking cabinet at about half the cost. You also avoid the mess and inconvenience of completely removing and replacing your cabinets. If this sounds good, let's move ahead:

Advertisement

Step one: Research your options. Look on the Internet to find the hundreds of companies that offer refacing materials. There are a lot to choose from, and it's safe to say that someone out there makes a cabinet door that fits your taste. The major home-improvement retail stores also sell these items special order -- there are far too many styles to keep in stock. In your research, determine whether or not you want to use plywood or a self-adhesive covering (SAC) for your end panels and frames. The plywood comes in precut pieces and is glued on the exposed sides of the cabinet box. The self-adhesive covering is a thin sheet of wood or woodlike laminate that's peeled and stuck or ironed onto the front of the cabinet frame.

Step two: Measure your cabinets. Once you've researched and decided the direction you'd like to go, you'll need accurate measurements to order your materials. Sketch out a rough drawing of your cabinet layout and label the different sections to help you keep everything in order. Measure the cabinet doors and drawer fronts with a tape measure and record your lengths and widths on your diagram.

Step three: Remove doors, drawer fronts and hardware. With a screwdriver, remove the cabinet doors, drawer fronts, hinges and hardware. If you plan to reuse the hinges and hardware save them with the screws for later. Next, lightly hand-sand all surfaces of the cabinet box and end panels. Use 150-grit sandpaper and never use a power sander -- it will dig in too much. Your goal is to simply scuff the surface somewhat to allow for better adhesion of the plywood or SAC. After you sand, use a tack cloth to clean the dust from the surface and then wash everything with some warm, soapy water. Tack cloth is basically just sticky gauze used to clean sanded surfaces and can be found in any hardware store.

In the next section, we'll get into the next step in your refacing journey.

Advertisement

Refacing and Adding Hardware: Steps 4-7

With custom cabinets costing upwards of $20,000, you should really consider refacing.
©istockphoto.com/George Peters

The next step for refacing comes when the materials arrive. If you did a good job measuring the cabinets and drawers, then your job will be a whole lot easier.

Step four: Start with the end panels. Using high-quality wood glue, make a zigzag "S" pattern on the back side of the panel from top to bottom, about an inch from the edge. Line it up, stick it on and press firmly on all corners, then the center. Wipe away any glue that squishes out immediately and secure the panel with finishing nails. These small nails can be found at any hardware store. Put one in each corner and then every 8 inches or so down the sides.

Advertisement

Step five: Add veneer. The next step is to apply the SAC to the fronts of the cabinet boxes. Using sharp scissors or a utility knife, cut out strips of the veneer that measure a half inch wider and 2 inches longer than the stiles and rails you'll be covering. Peel the backing from the top of the strip and line it up evenly before pressing down. Then peel the rest of the backing as you go down, pressing the veneer onto the cabinet frame. Once the pieces are in place, you need to trim the excess from the rails and stiles. Use your utility knife and straight edge to make even cuts. It's important to note that you should finish one cabinet at a time. Use your 150-grit sandpaper to smooth out the edges of the trimmed veneer. Your final step is to take a Plexiglas scraper and apply pressure on the SAC from the top down.

There is also an iron-on version of the veneer. It's applied in the same way the SAC is, except it's ironed onto the front of the cabinet, not pressed on with an adhesive. Once you have the veneer ironed on, you would trim and sand it in the same manner outlined above.

Step six: Replace hardware. If you're using the same hardware, simply reattach it in the existing holes. If you want new hardware, the easiest thing to do is take one of the old pieces to the store with you to compare sizes. You don't have to buy in the same size, but it will prevent you from having to fill in the old screw holes. If you can't find any you like in the same size, use a wood putty to fill in the previous holes and drill new ones that match the hardware you've chosen.

The final step is to attach the door and drawer fronts. Follow the instructions that come with the materials closely. Never put new hinges back into the previous hinge holes that lay beneath the new veneer surface -- they can become loose and pull the veneer off. Ideally, the hinges should be 2 inches from the top and bottom of the doors. So if you're putting in new hinges, stay as close to that measurement without using the old holes as you can.

The next step is to redo the doors and drawers. The possibilities here are endless. You can reface the cabinet doors and drawer fronts to match the base that you just veneered, or you can get a little more creative. You can use plastic, Plexiglas, tile or glass to dress them up. Or, if you running low on time and have some extra money to spend, you can always order premade doors and cabinets.

Once you have your door and drawer fronts back on and the hardware in place, stand back and marvel at your brand-new looking kitchen cabinets. Now pat yourself on the back for doing it yourself and saving a lot of money.

In the next section, we'll look at whether or not painting your cabinets is a good option for resurfacing.

Advertisement

Painting Your Cabinets

Picking out paint colors can be stressful -- but not for these two.
Tanya Constantine/Getty Images

Painting is much cheaper than a DIY refacing job, so if money is tight, it may be your best choice. Some people also prefer the look of a painted cabinet to a natural wood surface. Like refacing, preparation for the job is crucial for a successful result.

Step one: Clean the surface. A clean surface is essential when you're painting grimy kitchen cabinets. Remove the doors, drawers and hardware to make everything easier. Get some trisodium phosphate (TSP) cleaner from your hardware store and be sure to follow the safety precautions listed on the product. This cleanser will remove all the greasy buildup that's sure to be on your cabinets. After you wash, rinse the cabinets with a sponge and some clean water.

Advertisement

Step two: Sand the surface. Lightly hand sand the entire surface with 150-grit sandpaper. After you sand, use a tack cloth to clean up the dust and then wipe it clean with a wet sponge.

Step three: Apply a primer coat. If your cabinets have never been painted, you should apply a primer coat. Primer is a base coat, usually white, that improves the bond with the paint. If you're painting the cabinets a darker color (like a red), the primer may be a lighter shade of your paint color. If the cabinets have already been painted and you're repainting in a similar color palette, you can skip the primer coat and move directly to step four. Generally, oil-based paints require an oil-based primer and latex primers are used with latex paints. Apply latex with a synthetic fiber brush -- oil-based primer needs a natural bristle brush.

Step four: Paint away. When it comes time to buy your paint, don't go with the cheapest option -- you get what you pay for. Latex paints dry quicker and are easier to clean up than oil-based paints. Oil-based paints may give you a tougher and smoother surface. There are also paints that are made specifically to stand up to the rigors of a kitchen or bathroom. Glossy finishes are easier to clean and typically have a tougher "shell" than matte finishes. This decision really comes down to your tastes, though.

You'll also get what you pay for in the quality of your brush. A nice high-quality brush isn't cheap, but it's well worth the money. Don't use foam applicators and avoid using a roller as well. The best final coat will come from a 2.5- or 3-inch brush. You'll need to apply at least two coats of paint -- maybe even three, depending on how the second coat looks.

After the second coat is fully dry, carefully reinstall all the hardware, followed by the drawer and cabinet fronts and you're all done. For more information about home renovation, please clean the paint from your fingers and click forward to the next page.

Advertisement

Lots More Information

Related HowStuffWorks Articles

More Great Links

Sources

  • Alward, Mary M. "A Guide to Refacing Kitchen Cabinets." doityourself.com, 2006. http://www.doityourself.com/stry/remodelopportunities
  • Barrett, Neal. "Painting Kitchen Cabinets." Popularmechanics.com, October, 2003. http://www.popularmechanics.com/home_journal/home_improvement/1276486.html
  • Consumer Product Safety Commission. "What You Should Know About Lead Paint In Your Home: Safety Alert. http://www.cpsc.gov/CPSCPUB/PUBS/5054.html.
  • Gibson, Scott. "Painting Kitchen Cabinets." thisoldhouse.com, 2008. http://www.thisoldhouse.com/toh/article/0,,202424,00.html
  • Goode, Pete. "Reface or Replace Cabinets?" thisoldhouse.com, 2008. http://www.thisoldhouse.com/toh/article/0,,220605,00.html
  • Granju, Katie Allison. "Cabinets: Should You Replace or Reface?" hgtv.com, 2008. http://design.hgtv.com/kitchen/Article_detail.aspx?id=556
  • Heffernan, Cam. "Re-Facing Kitchen Cabinets." hometips.com, 2008. http://www.hometips.com/articles/cabrefacing_guide.html
  • Romano, Jay. "YOUR HOME; Refacing Kitchen Cabinets." The New York Times, July 25, 1999. http://query.nytimes.com/gst/fullpage.html?res=9F02E1DC143EF936A15754C0A96F958260
  • Simkins, Brian. "Cabinet Refacing 1 - Planning and Preparation." doityourself.com, 2007. http://www.doityourself.com/stry/refacingcabinets1

Advertisement

Loading...